SeaPak Shrimp Scampi

Comment

SeaPak Shrimp Scampi

I stopped by Von's after having a few glasses of wine with some coworkers for our department potluck. I think it was around 5 when John asked me about dinner. I do remember telling him I'm planning on leaving in 1-1.5 hours, so we could still have dinner together. Checked back and realized it was 9 with hangry text messages. Eeeeppss! I really messed up this time.

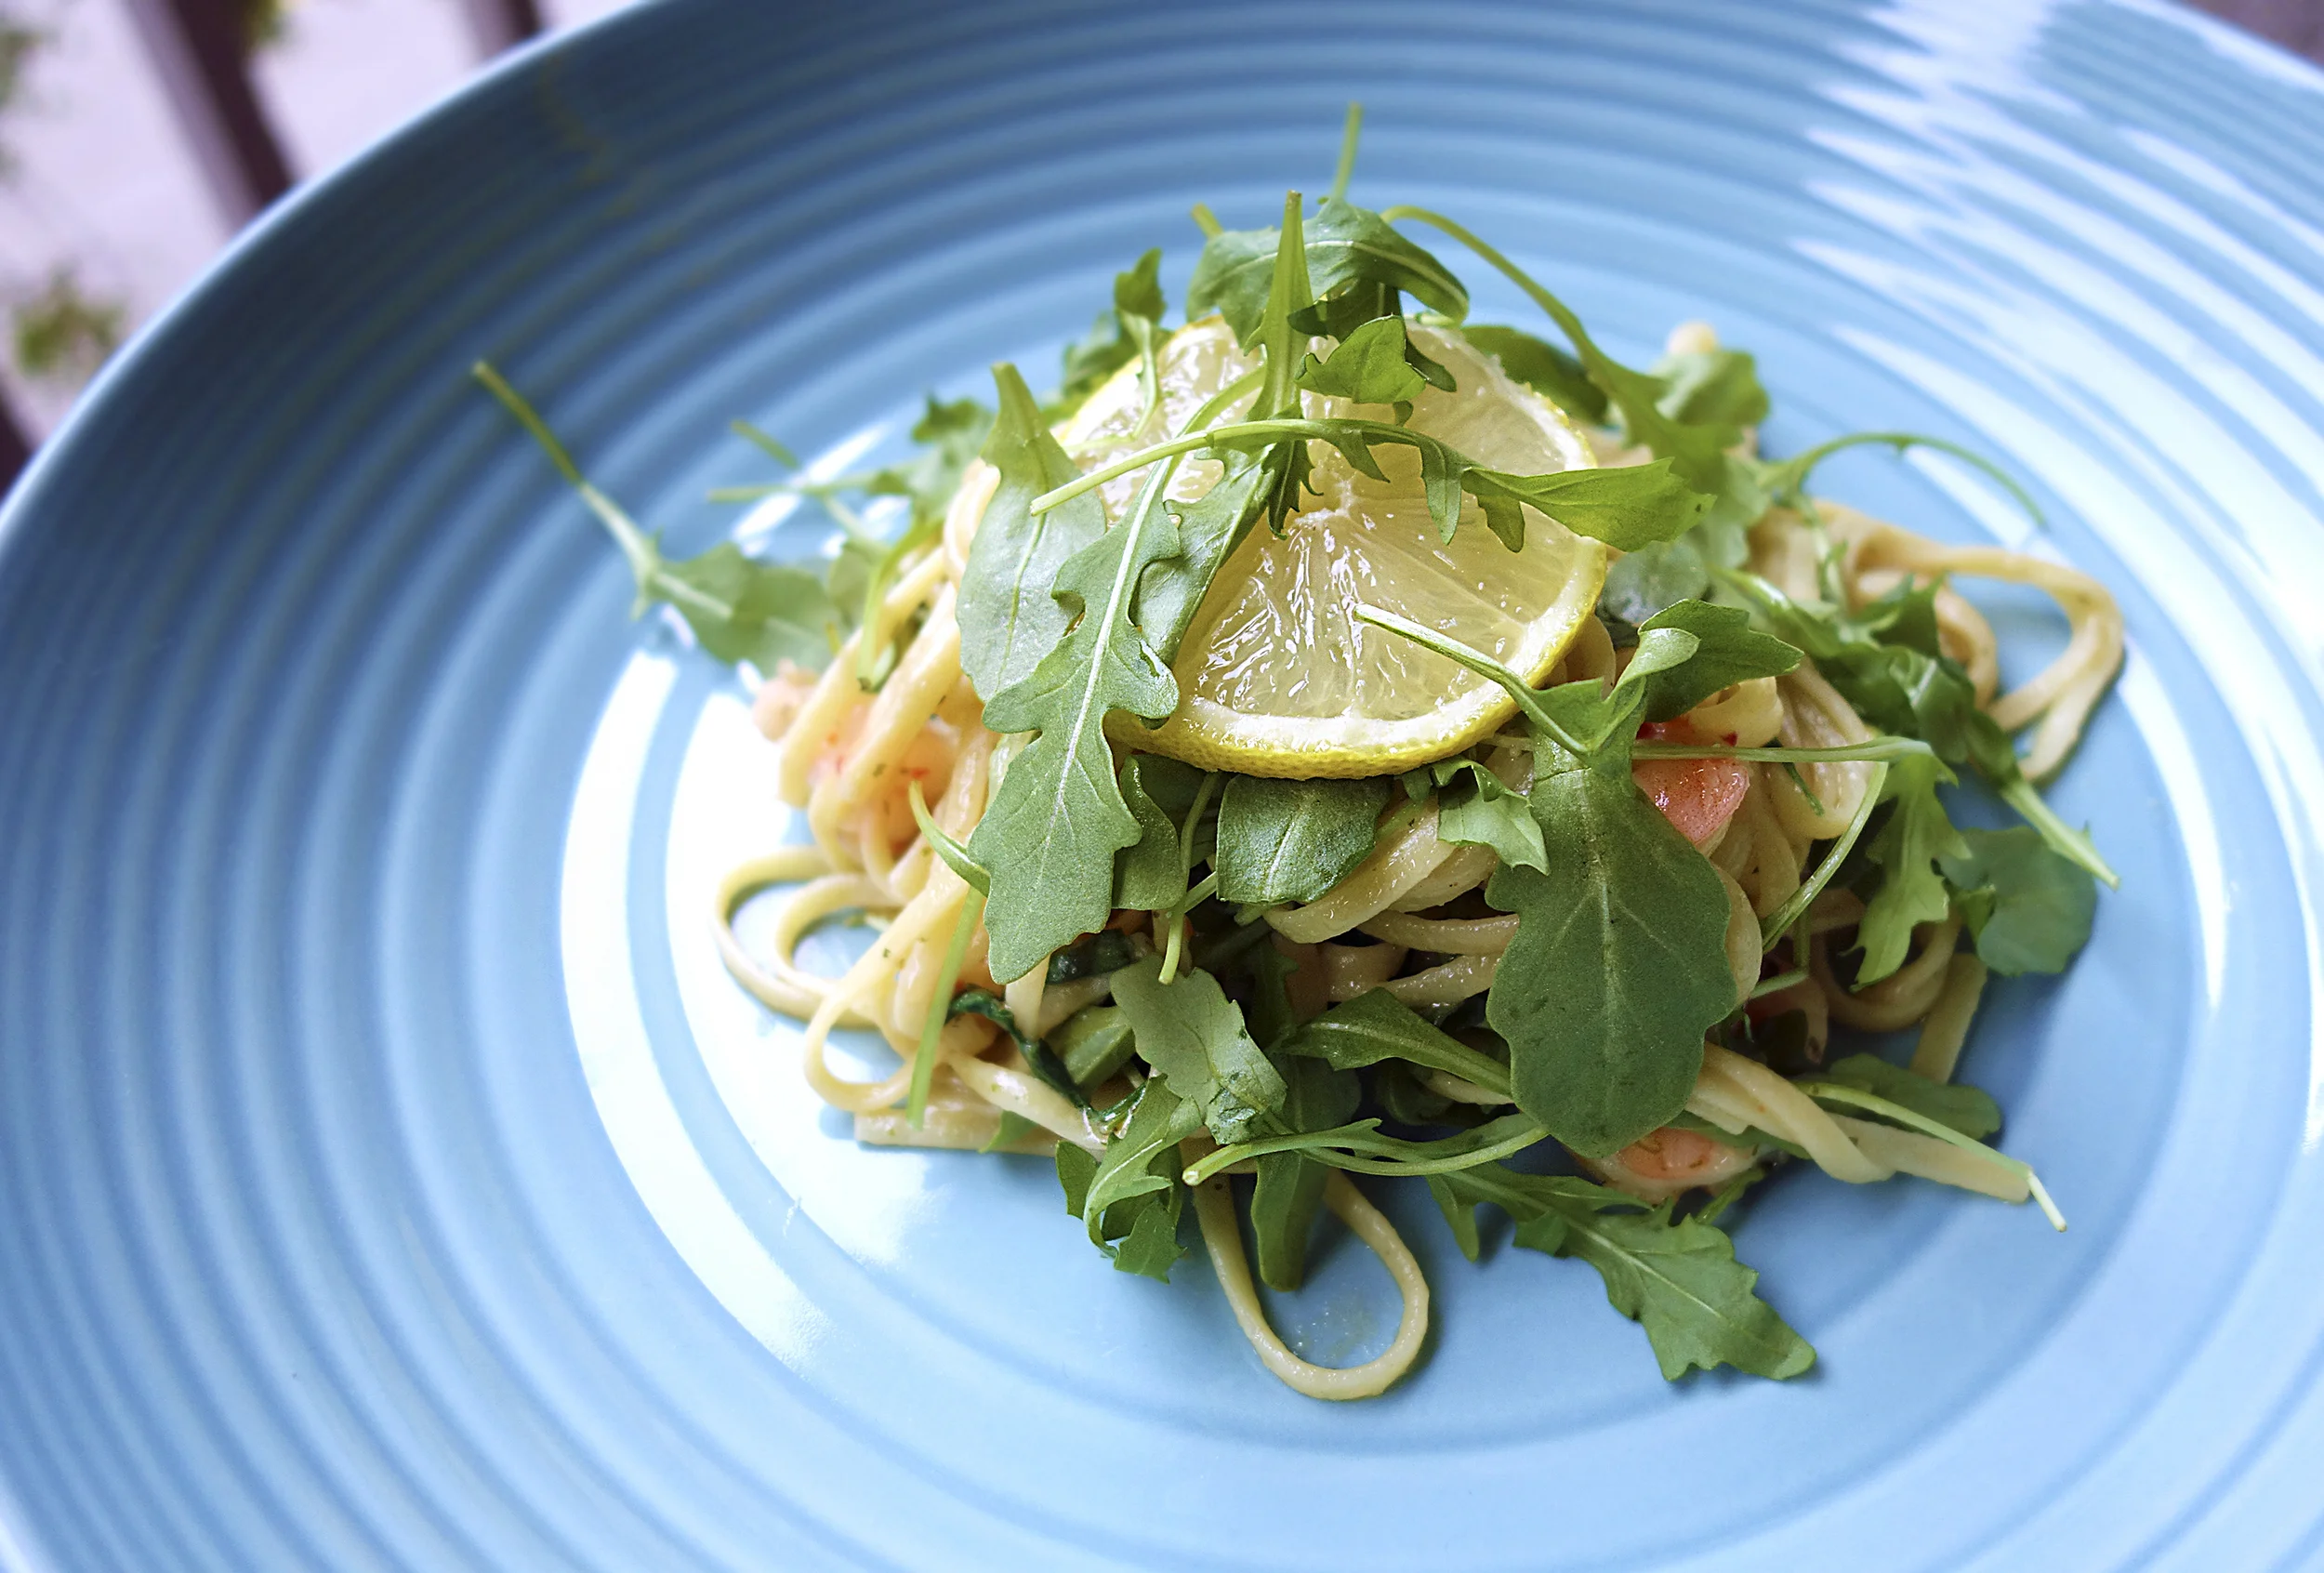
Back to Von's, I was trying to find something really good. Not just for him to be happy, but I was pretty hungry myself. After a few strolls, I came across a selection of SeaPak products. I've never paid attention to much frozen foods until recently. I do have a not-so-secret obsession for frozen TV dinners. My dad would always brought home frozen Banquet and Maries Calendar dinners, so frozen meals always had a place in my heart. After cooking one pack with thin spaghetti, I realized how much I underestimated the product.

Recipe:

  • 1 12 oz frozen SeaPac shrimp scampi
  • 1 1lb of linguine pasta
  • 1 lemon
  • 2 packed cups of baby arugula
  • salt for seasoning pasta water

Pretty simple. Start a pot of heavily salted boiling water to cook the pasta till al dente. On the side, start cooking the shrimp scampi about 4 minutes before the linguine is ready. Drain the linguine and return it back in the pot, throw in the arugula, and then pour in the shrimp scampi. Mix everything all together and serve with the lemon and Tabasco hot sauce.

I layered the pasta with arugula to add some color and more texture. Plus, It's a good way to incorporate veggies in your food. I can honestly say, this shrimp scampi is better than a lot of scampi I've had, even at a fine dining restaurant. The shrimp is smaller, but the butter, garlic and herbs were on point. The flavors were really refined and not something I would expect to find frozen. I went back today, and bought 3 more boxes.

John was extremely happy, and I am not in the dog house anymore.

Everyone wins! Go get a pack and let me know what you think. It was on sale today, 2 boxes for $10! What a steal.

Daisy

Comment

Comment

Lemongrass Beef

I've been craving lemongrass beef for the longest time EVER. I've also been meaning to make it, but never had much time to do so. And the days that I do buy lemongrass, they would start molding since I dont end up making the dish. With that said, I went ahead and bought a tube of lemongrass which you can find at your local market (I got mine from Ralphs).​

I had a piece of frozen skirt steak weighing in at about 1.5 pounds defrosted. I like to utilize what I already have, and ​simple ​recipes like this makes it easy.

​recipe

  • 2 tablespoons of lemongrass paste by Gourmet Garden​
  • 1 large clove of garlic​
  • 1 tablespoon of fish oil ​
  • 1 tablespoon or so of granulated sugar​
  • ​1-2 tablespoons of lemon or lime juice (whatever you have)
  • 1/4 teaspoon ginger powder​
  • 1/4 teaspoon of salt​
  • 1/2 teaspoon of cracked black pepper​
  • 1 red Thai chili​
  • 1 shallot​

The list may look lengthy, but you should have most of these items at home. For the red Thai chili, I keep a container of it in the freezer so they won't spoil. Garlic is minced, chili and shallots are sliced. Put All ingredients in a mixing bowl and let it marinade for at least 30 minutes to an hour. ​

On high, add some oil to your pan followed by your meat. You want a good sear and you will notice the char building on the steak from the sugars caramelizing. By the way, the skirt steak was cut up to smaller pieces before marinating. ​

Served with steamed jasmine white rice and your choice of veggie. Drizzle with sriracha and more citrus!​

image.jpg

Enjoy and happy cooking!


Comment

Comment

Beef Stew - EASY PEASY

This recipe is made for my friend Joanne. From her daily commute, to the hours that she spends at work, she is literally spending 12+ hours away from home. Does this sound like you? If so you need to get your self a slow cooker NOW. I've made beef stew once with my slow cooker, but this time I made sure to document the steps. My friend JoJo has been contemplating on getting a crockpot, well now she better get one. I mean it Jo. I know you will be seeing this post so the pressure is ON.

First things first. The night before, prepare EVERYTHING. For Jo, she's spending that much time away from home so I'm already assuming she will have no time to do so the day of. After all, one of the discouraging things about cooking is the prep work. But, if you actually do it ahead of time and be organized about it, you will realize how easy your life will become.

Recipe:

  • 4 pounds of beef chuck. Cut in Large chunks.
  • 2 large carrots. Cut 1-2 inches.
  • 4 celery roots + all the leaves from your original bundle.
  • 1 large white sweet potato. Cut into large cubes.
  • 1 large onion quartered. Not diced.
  • Literally, 10 cloves of garlic.
  • 1 cup of beef stock.
  • 2 Tablespoons of corn starch. (For last step to thicken the stew)
  • Salt.
  • Black Pepper.
  • Lawry's garlic parsley salt.

What? That's it? Remember! I want to make recipes that are within your reach meaning you should be able to whip up something quickly and not be intimidated. Don't underestimate yourself.

Whole Chuck

You can always get top round.. but I love fatty marbled meats. I always buy a large piece instead of little chunks because the meat will disintegrate if it's cut too small. Remember, if you have a career that's 8 hours of your day, and you live in Los Angeles, you are probably out of your home for 10+ hours of your day. Big chunks will make sure you will still have a normal looking stew. I seasoned the meat liberally with Lawry's garlic parsley salt. It's sold at your local grocery store, but a huge bottle can be found at Costco.

Sear this bitch on High. I used Thrive algae oil since it has a super high smoke point. All sides were nice and golden. After the beef is removed, I added about a 1/4 cup of water to scrape off the brown bits. It's all flavor sugah don't leave none of that behind. Let the beef cool, saran wrap, then throw this beast in the fridge!


The Layers

Ok, after coming home to his, I am changing the layers.
First layer should be onions & garlic, followed by potatoes, beef, mushrooms, carrots, celery, and celery leaves.

By leaving your meat on the bottom or mid layer, it will ensure you that your meat is submerged in sexiness till you arrive. Otherwise, it will get cold if your crockpot stopped at a certain hour. If your crockpot is off, turn it back on to mix 2 tablespoons of corn starch (dissolve with a little water before pouring the slurry) Cooked some spaghetti with it to arrive with:

Yum! Flavor PACKED! Amazing with spaghetti. You can always use a different starch, like rice, but I've been eating that almost everyday and wanted to break away from that (I used "Break away" because Kelly Clarkson "Break Away" is currently on). Use whatever you have! and remember if you have any leftover herbs that are almost at the end of their lifetime, go ahead and throw them in! Because.. who knows it might taste amazing.

If you let the stew cool completely in your fridge, you can make beef pot pie! Look at you all looking like a chef. I am so proud.

Get cozy with warm fuzzy foods.

Daisy


Comment

2 Comments

Spiced Honey Chicken

I happened to have some chicken breast hanging out in my fridge and decided to whip up something without purchasing new ingredients.  

Recipe 

  • 2 large bone in chicken breasts
  • Lawry's garlic salt (my favorite) 
  • 6 tablespoons of honey
  • 1 tablespoon of olive oil
  • 1 tablespoon of red wine vinegar
  • 1 teaspoon sweet paprika  
  • 1 teaspoon Ancho chile powder  
  • 1/2 teaspoon cayenne pepper  
  • 1/2 teaspoon dry parsley  

step one: 

Preheat the oven to 350. The chicken is patted dry before seasoning with Lawry's garlic salt.  IF time permits, I like to let the chicken air dry in the fridge for at least an hour. I don't oil the chicken till later.

step two: 

After 30 minutes, I take the chicken out and brush a layer of olive oil. Stick the chicken back in for another 10 minutes with the oven cranked to 375. 

step three: 

Mixed the spices, the honey, vinegar and that one tablespoon of olive oil in a bowl with a dash of salt. I didn't have any lemons, and that's why I used red wine vinegar for acidity. After the chicken has been in for another 10 minutes, brush the honey sauce over the chicken and pop it back. Let it go for another 5-10 minutes. The honey will start caramelizing.  

image.jpg

I brushed 2 coats of the honey mixture. The skin was nice and crispy! For the side dish, I just microwaved some frozen corn then mixed it with mayonnaise, and then seasoned with salt and cayenne. 

Super delicious and easy. Extremely effortless and definitely something people will rave about. 

enjoy!  

Daisy  

2 Comments

Egg "Muffins" and Hashbrowns

Comment

Egg "Muffins" and Hashbrowns

Happy Sunday folks! I've been thinking that it's been a bit since I've made breakfast. Everything has been great in my life, and time has finally slowed down a little for me to catch a break. I've been extremely excited for the Holidays. It gives me every reason to eat whatever I want. I already do... BUT, it's an excuse to do so, and no F*cks will be given during this time. Really, but not really.

I've decided to make egg muffins after seeing so many posts about it. It's super simple. Even for a dude.

Recipe (Makes 6 servings):

  • 1 dozen eggs. I use "Happy Eggs".
  • 1 pack of Farmers John Sausage. You know, the ones that sells for $1-$2.
  • A flew florets of broccoli, about 1 heapfull tablespoon in each muffin.
  • 6 strips of bacon
  • 1/3 cup of your choice of dairy.

Equipment:

  • Your oven, preheated at 350
  • 1 muffin/cupcake tin with 12 slots (standard). Greased (very important to spray your tin).

The bacon is cut into little pieces then cooked till crispy. These are removed onto a paper towel to soak out the grease. The sausage is broken apart in the pan as it cooks to little chunks. The broccoli will be placed on the bottom of each hole, then the sausage. Whisk all the eggs together with your dairy of choice. Don't forget to salt and pepper your eggs.

Ladle your eggs in each of your muffins. Lastly, top with the bacon, and bake in your oven for about 20 minutes. Make sure to let your eggs rest about a minute or 2 before removing them from the tin.

HASHBROWNS!

1 large russet potato is all you need to serve 2 people. I simply scrubbed the potato until running water before grating. I then rinsed the potato a few times until the starchy residue went away, and the water becomes clearer. My grated potatoes were just hanging out in salted water while I was cooking my egg muffins.

The potatoes were rinsed off again, and strained to drain off any excess water. In a nonstick pan, I added about 4 tablespoons of oil. You are basically going to pan fry these babies. I put the potatoes in the pan, gave it a few tosses for it to be evenly coated with the oil, seasoned again with salt and a little pepper with dash of garlic powder. Now on high, I wait for the potatoes to get crispy on the bottom. You will notice by crowding the potatoes will also start steaming. This is fine as it will cook the potatoes more thoroughly before browning. If you are a bit intimidated, feel free to set your temperature to medium high. I adjust the temperature as I go. Once the potatoes are turning golden, I flipped the hash, and then added a few more table spoons of oil to make sure both sides will be golden.

Serve with Ketchup and Sriracha!

So easy and so fun! You can put whatever you want in these egg muffins. Whatever leftovers you have will be great in this.

Enjoy!

Daisy


Comment